Blog - Overview

Blog - Overview

Sunday, December 21, 2014

Pharaoh Fuzz (King Tut)

General

The Pharaoh Fuzz is a very versatile Fuzz. Its also Muff based circuit (to be exact its a modified version of the Rams Head Muff), but it has following additonal features:

-) A fourth pot "High" for the High frequencies (additional to the Tone control)
-) Several clipping options: Silicium, Germanium or no clipping
-) Input filter selection: High or Low

The Black Art Toneworks Pharaoh Fuzz is one example of the Pharaoh on the current pedal market

Schematic

The King tut project from rullywow has the same schematic as shown below:


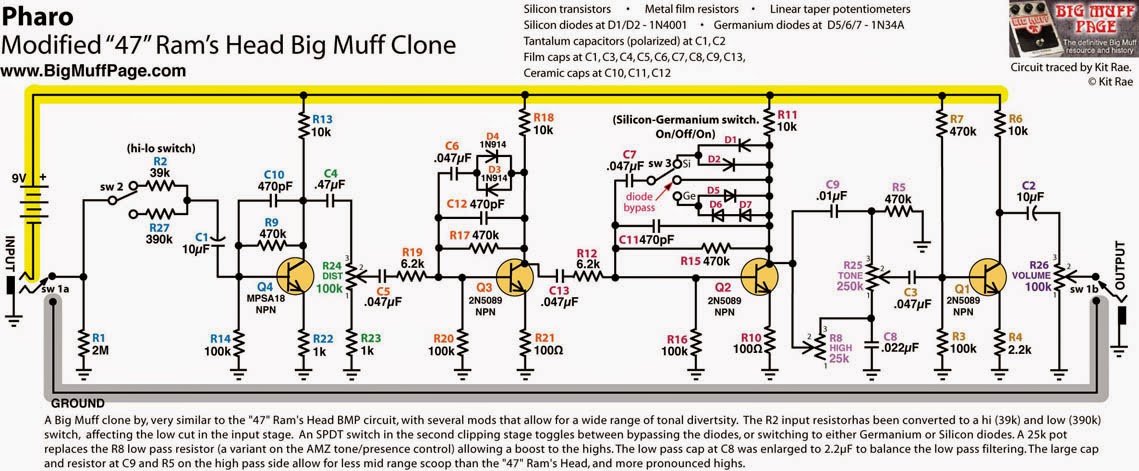
The Blackart toneworks pharaoh fuzz features 470nF caps instead of all 47nF caps shown in the schematic.

PCB

A very cool project to build the Pharaoh Fuzz is the "King Tut" PCB from www.rullywow.com
The PCB is double layered, very small and looks awesome :)

I used this one for my build. Instead of the 47nF caps I used 470nF, as in the Blackart Toneworks one.

Drill Plan & Decal

Here you can download the decal and the drill plan of my build
I have used this enclosure
http://www.musikding.de/Box-Type-B-orange

Download Links:

My Build


Here are some Pictures of my Build. I also used the cool DPDT breakout board for the switch from rullywow to have lesser wiring inside the enclosure


Wednesday, December 10, 2014

SRV Special Tube Screamer

SRV Special...

The SRV Special is a modified Tube Screamer Circuit. Some capacitors and resistors are left, to make the sound more pure. Furthermore 1M or higher is used for the GAIN pot to increase the GAIN range of the pedal.

The pedal is an approach to get closer to Stevie Rays Sound...


The Mods have been invented by JC Maillet in 1997. 
Read the whole story here:
http://www.lynx.bc.ca/~jc/pedalsSRVspecial.html

Schematic

Compared to the original Tube Screamer Circuit, the input capacitor has been increased from 27nF to 10uF (this is also known as Fat input cap Mod).

 The 1uF and the 10k resistor before the + input of the first OP amp are gone. Also the 51nF capacitor parallel to the diodes has been removed.

The Gain Pot has been increased to 1M or 2M for more gain.

The 1uF after the output of the second OP amp disappeared, also the cap and the pot before the base of the second transistor.

As Transistors 2SC1815 or 2n5210 are common. I tried also BC549 and couldnt recognize any difference.
As OP amp IC, you can use a classic JRC4558 or also TL072 (more clarity)


My Build

I used a TS808 Kit from uk-electronic.de 
When assembling the PCB I used jumpers for the parts that are missing in the SRV special or I just didnt assembled anything.

Exactly I did the following:
-) Omit 51pF capacitor (parallel to the diodes)

-) Replace both 1uF caps with jumpers
-) Replace the input cap (27nF) with a 10uF elecotrolytics (- side points to the input)
-) Omit 10k resistor at the + side of the first OP amp
-) Omit 510k resistor at the base of the second transistor
-) Replace the 100nF cap at the base of the second transistor with a jumper
-) Jumper 100R resistor in series to the output cap

For the enclosure, I used the pre-drilled 808 enclosure from uk-electronic and just placed a label there (OK i was too lazy to design an enclosure there) 


Demo 

Here you find a demo of my Build:
https://www.youtube.com/watch?v=bFoVfxV-aeU 

Monday, December 8, 2014

Axis FuzzFace Silicon

General

 The Axis Face Silicon is a Silicon Fuzz Face Circuit with some mods. The schematic and description of the pedal can be found at Fuzz Central:
http://fuzzcentral.ssguitar.com/axisface.php

Basically there is a additional pot called "Smooth". The more the control gets dialed clockwise, the smoother and overdrive like the fuzz gets. With this control its easier to get a smooth / round / creamy fuzz tone out of the pedal

In my build I also added a fourth pot "Contour". Instead of the 1k2 resistor, I used a 220R resistor and a 1k pot in series. The pot can be used for fine adjustment of the tone and the gain. When tuned clockwise Gain and midrange is increased. When turned all the way up, the value is the same as in the Axis Face Schematic from FuzzCentral.

So the controls are:
-) Volume
-) Fuzz (Attack in the Axis Fuzz Schematic)
-) Smooth
-) Contour

Schematic


Instead of the 1k2 resistor I used a 1k pot and a 220R resistor in series, like shown in this schematic:


PCB

As for every pedal you can built it on a vero. I ordered a PCB from musikding.de. Its a universal fuzz face PCB, and can also be used to build up a 69 Fuzz Face or the Axis Fuzz Silicon.

Build

Here are some pictures of my Build.


Demo

Here you find a Sound Demo of my Pedal.
Most time I used my favourite settings. Fuzz Control is turned all the way up for most settings. I only changed the Smooth and the Contour pots.
https://www.youtube.com/watch?v=-BH72UDCLCQ

Saturday, December 6, 2014

Gainster / Hoochee Mama Overdrive

First

The Clark Gainster is a rare and not too hyped drive pedal. Its one of the sweetest sounding drive pedals ive ever heard so far though.

The clark gainster has a very simple circuit, but sometimes less is more.

The gainster can be built with Mojo parts or not. This article is more about the mojo part one ;) I called my version of the Mojo Gainster: Mojo Drive ;)
Because mojo parts are not small, the enclosure should be big enough and the whole has to be built on a vero ;) you can use existing veros. i just built the vero up by myself.

For the non mojo version the Egghead PCB from madbean can be used.

The Clark Gainster can be built up with 3 or 4 pots. Drive, Tone, Gain and optional the Bottom Pot, which an be used to cut / add bass frequencies. In my built i didnt use the Bottom pot.

You may have heard of the Hoochee Mama Pedal. Its a 3 knob clark gainster clone with mojo parts and used by Coco montoya and lance lopez.

Schematic

This schematic shows the circuit for 3 pots and also the addition for the 4th pot. You simply need one more cap for the 4th one.
In the schematic you see also the mojo parts.

I found out, that the PIO caps (paper in oil) are kind of rare. I ordered them directly from russia.
http://www.tubes-store.com/
All other parts are available at musikding.de. you can also order a nice vero board there.

Tip: I used single core hard wires, they also hold the board ;)

Other mojo parts are the Mallory caps and the Carbon Comp resistors.
The IC and the diodes are not so critical. you can use a TL072, LF353 or any 4558 chip for the IC, and 1n4148 or 1n914 for the diodes.
In my build I used a RC4558P chip (hoochee mama uses TL072, JRC4558 ics). Also i used a 1M pulldown resistor from input to ground (not shown in the schematic), to prevent any popping sound when turning on the effect.
Also the Hoochee Mama uses either a tropical fish or a orange drop capacitor as output capacitor (100nF before the Volume pot).

My build

Here are some pics from my built mojo drive gainster


Mojohand Iron Bell Fuzz

General

 The Iron Bell is a big muff variant based on the P19 version of the muff

Here is a interesting link with a lot of schematics:
http://www.bigmuffpage.com/Big_Muff_Pi_versions_schematics_part4.html

In addition to the Big Muff there is a fourth pot for the mid range, called colour ;)

Schematic and BOM

This schematic ive found in the madbeanpedal forums posted by Matt (croquet hoop, thanks a lot).


They are similar with some minor differences to the P18 schematic from the bigmuffpage.com

-) P19: has the addiontal C16 (2.2nF) which adds high frequencies when the tone pot is down
-) P19: R2=33k, Iron Bell: R2=30k
-) P19: R22=140R, Iron Bell R5=120R
-) Iron Bell: additional R24=100R. Changes the high frequencies of the tone control top end

PCB

Currently there is no PCB for the iron bell available. I ordered a muff pcb from musikding.de and chnaged the parts accordingly and soldered the additional pot (colour) to the lugs of the C10 Cap (iron bell schematic)

My Build


I coloured the enclosure pink (using a spray finish) and put a waterslide decal on it, the use clear coat laquer spray.
The design of the waterslide decal was strongly influenced by the mojohand design.
I attached a PDF with my design.


Download the Decal here:
https://drive.google.com/open?id=0Bxh1DRKqtqqDX3EyOW1yZUYxbmM