Blog - Overview

Blog - Overview

Sunday, June 19, 2022

Tonebender MKIII

3-Knob Tonebender Fuzz

Most popular fuzz circuit besides the Fuzz Face is probably the Tonebender, which is also very simple but has 3 instead of 2 transistors.
There have been different variations of the Tonebender Fuzz curcuit. The MKII has two knobs - volume and fuzz - and there are also 3-Knob versions which have an additional tone knob. 
 
Tonebender is a Fuzz circuit that consists of 3 PNP germanium transistors. That means a voltage inverter is required if you want to run it with all your other pedals on a multi power supply. Otherwise you would need an own power supply only for this pedal or use a battery.


My Build

For my build i have used a terminal board with end-to-end soldering. I used carbon comp resistors, mallory caps and AC75 transistors.

For the voltage inverter i went with the madbean road rage, which features a 3PDT wiring and a charge pump (or voltage inverter) all on one PCB.

I use solid wires, which hold the terminal board in place.
 
You can find the schematic on FuzzCentral:
https://fuzzcentral.ssguitar.com/3knob.php

I have built the The Vox ToneBender MKIII version.


Sunday, June 12, 2022

Klon Centaur

Klon Centaur

The original Klon Pedal is no longer produced and hence very expensive (+7000$ range and up). Thats why there are many clones of the Klon, many different DIY projects, for example the Kliche overdrive, the Kherion Klon from PCB Guitar mania and the AionFX refractor.

Ive used the refractor project because it has some things ive wanted and I like:
  • Fits into 125B Enclosure (maybe even a 1590B)
  • PCB mounted pots
  • Switch between buffered bypass and true bypass
  • Circuit based on the original / KTR, same parts values etc

I also liked the extra PCB for the 3PDT switch and that not much wiring has to be done.

Build Notes

I ordered a Refractor Kit from musikding. For the charge pump it contained a ICL7660SCPA chip, but with the Refractor schematic values this would cause a high pitch hissing noise. I have replace it with a TC1044SCPA and everything is quiet and works smooth like a charm!

Also for the audio jacks i needed to cut off the third connector, since it would have directly touched the pot and / or the pcb. I have used the pre-drilled enclosure from musikding.
 
I have used germanium D9E diodes, sounds great! You can also use BAT41, 1N4148 or 1N914. Even LED is possible. You can socket the diodes and experiment. 
 
If you want to build a Klon with most every mod that are all switchable, the Kheiron Klon is the project to go.

For labelling the enclosure i used a printable vinyl sticker foil and finished it off with epoxy resin.

Great sounding pedal. Its very transparent, has a lot of volume / headroom and is more in the low gain range, great for blues and rock.

Was a lot of fun to build. Please check out the AionFX homepage for documentation and schematic. Its extremely well documented.


Sunday, June 5, 2022

Finishing pedal enclosures with Epoxy Resin

Tutorial: How to finish pedal enclosures with epoxy resin

Ive been asked quite a few times, how i do my pedal enclosures. Thats why I decided to do a full tutorial on this blog, since its not only to show my work, but also to inspire, share knowledge and help others. 

There are some ways to get designs on pedals, not only for labelling controls but also to make them look prettier. Most popular methods are using decals and finish them with enamel or epoxy resin, or use the edging techique. Ive tried most of them and epoxy resin works the best for me. 

If you wanna use decals on pedals, you need to fnish them to protect them, so they are not destroyed or worn off. Epoxy is really cool, because its a pretty thick layer of protection and has a glossy look to it, which I like.

What is epoxy resin?

Generally epoxy resin is a transparent thick liquid, that hardens after some time when mixed with a hardener substance. When you buy epoxy resin, you get two bottles: a resin and a hardener. These two has to be mixed together, usually with a 1:1 ratio (depends on the product). Common brand of epoxy resin is envirotex (popular especially in the US).

Epoxy is usally non toxic and not dangerous. Just make sure to avaoid direct contact with the body, clothes etc, since its very sticky and hard to wash off. Also watch out to protect your tables, floor etc.

Epoxy resin is commonly used for furniture and wood finished, also for gardening work. I find it to be underrated in pedal building.

What do you need?

Checklist whats necessary and recommended to start off with finishing your pedal.

  • Drilled pedal enclosure (usually aluminium)
  • Carpet knife
  • Epoxy resin with hardener
  • Cup and stick for mixing the resin. The cup must be clean and dry
  • Gloves
  • A scale
  • Wide tape (gaffa tape for example) if you want to avoid the sides.
  • Cardboard or plastic tape for protection of table, floor (i always use cardboard)
  • Some thing to place your pedal on, so its not in direct contact with the floor (see later steps)
  • Some bucket to protect the resin from insects, dirt and hairs while hardening


Steps

1. Prepare your enclosure and decal 

Prepare your enclosure. Enclosure must be completely drilled. Also make sure that the enclosure is clean of drilling edges, dirt and is also dry.

Print out your decal. You can use transparent waterslide or sticker decals. Since I have an inkjet printer I prefer using vinyl sticker decals, since i dont need to use enamel before placing them on the enclosure. Waterslide decals have the advantage that they can be moved after placed on to the enclosure.

Make sure the decal is printed out in the right size and every label is in place. When using an inkjet printer, let the ink dry for at least half an hour after printing. 
 

2. Cut out your decal

Cut out your decal with a scissor. Try to cut it out as approximately to the edges on the enclosure top as possible and also cut round the edges. Cut off little bit off the borders and always check with the enclosure by laying it on top.

3. Apply decal on the enclosure and cut out the holes

Apply the decal on the pedal enclosure. When using waterslide decals, place the decal in water and wait for the decal to come off the paper. You can move waterslide decals a bit after placing the on the eclosure, use a towel and wipe the decal carefully to remove water on top and underneath.


When using sticker decals, pull the paper off of one top edge. Place the edge on the enclosure and carefully place the sticker on from top to bottom. Then carefully press on the sticker decal and make sure it sticks everywhere and there is no air between the decal and the enclosure surface. 

Use a carpet knife and carefully cut our the holes in the enclosure. Otherwise switches and pots cant be mounted :) Make sure the knife is sharp and watch out not to tear off or scratch the foil.
Place the enclosure on to the place where the resin will be applied.  

4. Cover the sides of the pedal enclosure (if preferred)

If you do not want to apply resin to the sides of the enclosure, use a wide tape (e.g.: gaffa tape) and place it on to the sides. Place the tape so that there is a small space on top, so the resin can cover the edges and has more stability. I try to get some photos ready of this step.

This step should be considered, since it can be hard to get a good and even layer on the enclosure sides, since the resin rins down frop top to bottom. Also the resin can cover the bottom of the sides.

However in this example I also finished the side of the enclosure.

5. Preparing and mixing the resin

Before mixing the resin, make sure you have a place ready to place the enclosure on to. Also wear gloves.

Epoxy resin always come with a bottle of resin and a hardener, both are thick transparent liquids. Check the desciption on your resin, most resins have a mixing ratio of 1:1.

I always recommend weighing the resin, because then you can be sure that the ratio is correct. Put a clean and dry plastic cup on your scale. Some epoxy sets come with cups and mixing sticks. 

Fill the resin into the cup, usually almost half of the cup - dont go above half of the cup. Remember the weight. In my case i poured 14g of resin into the cup.

Then add the same amount of hardener liquid into the cup (if the ration is 1:1, otherwise you have to calculate). In my case I added 14g of hardener, which results into 28g of liquid.

Stir and mix the resin for some minutes. Go slow while mixing to avoid as many bubbles as you can. Continue stiring as long as there is nothing cloudy in the resin anymore and its completely clear.

6. Applying the resin on to the enclosure

Pour the epoxy resin on the enclosure. Make sure that the complete top and all edges of the enclosure are evenly covered. If you also finish the sides of the enclosure, check if resin is evenly applied there - you probably need to use a the stick or a brush a apply the resin evenly on the side. Layer on the side will be much thinner that the one on top.


Now you will probably have some bubbles in the resin. Make sure all bubbles disappear. You can do this by blowing or carefully using a fan. Also sometimes you can remove bubbles with the stick. Be very careful and dont touch the liquid with your face or hair.

Double check if all bubbles are gone and that there is no dirt or hairs in the resin. This process may take some time, take your time.

7. Drying process

After you are satisfied with the appliance of the resin, cover the enclosure with something that protects the resin from dirt, hair and insects. I use a plastic bucket for this, with a weight on top.


Let the resin dry for at least 24 hours. After this the resin should be hard and ready to work with. Epoxy resin will be completely hardened after 72 hours (3 days).

If the resin is hardened, carefully remove the enclosure from the surface and eventually remove the side tapes. Remove resin drops which in the enclosure inside, which occur because the resin rins down though the holes. You can use pliers to remove these drops.

If theres some resin at the bottom of the sides, remove them carefully with a carpet knife.Be careful because dried resin can easily produces cracks. Also cut out holes again with the knife, if necessary.

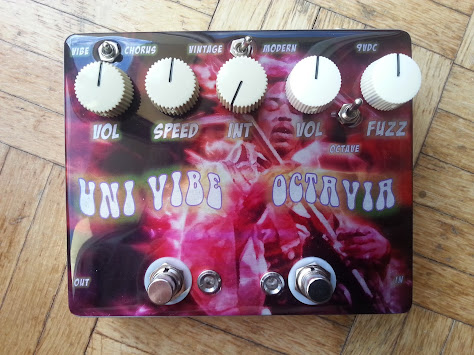
This should be the result.


Common errors 

I have failed many times and miserably, but its always a learning process. Mistakes happens. Here are some Ive experienced, hopefully you can learn from them.  

Resin does not harden or is sticky

If the resin is still sticky after 24 hours, theres something wrong. Most probably the resin hardener ratio is not correct or it has not been mixed properly. You need to start all over again.

The resin is cloudy on top

If the resin is fully hardened but still not completely clear, most probably the resin has not been mixed well or the ratio is not correct.

Surface is uneven or dirty

Most common error is that some dirt or hair gets stick in the resin during drying. This cannot be removed after hardening proces is done. You need to see how bad it is, either live with it or start all over again.
When the surface is uneven, it could have some reason. Either the enclosure was not placed on a completely even ground, or too little resin was applied on top or ran off.

Saturday, April 23, 2022

Univibe / Octavia Multieffect

Univibe Octavia Multieffect Pedal

This build combines two pedals, which were made famous by Jimi Hendrix: The Univibe and the Tycobrahe Octavia Fuzz.

I have used two madbean projects: The harbinger one for the univibe and the retrogade for the octavia. Ive put the octavia first in the signal chain.


Check out also my detailled build page of the univibe:
https://fuzzypedals.blogspot.com/2014/10/building-univibe-clone.html


Thursday, January 7, 2016

Madbean Dirtbaby

Lets get Dirtbaby...

The Dirtbaby is a recreation of the Deluxe Memory Man with the common delay chip PT2399. The DMM is Delay pedal by EHX which is also able to emulate a chorus / vibrato effect.
The edge of U2 is using the DMM for a lot of rythm stuff (fe: U2 Song - Pride), so ive decided to build a dirtbaby (sidenote: Theres a new madbean project for a analog Memory Man now available: The Total Recall).

All the parts are easy to obtain. The hardest part (for me) was the 2u2F NP (non polaric cap)

The Pedal sounds really great, its very very versatile. If you like delay pedals, i strongly recommend building it!

For my build ive used a true bypass switching system by uk-electronic.de
This cool switching works with a microcontroller and a relay. It ensures absolute noise-less switching and a longer life (momentary switches last longer than common 3PDT switches)

Tuesday, January 5, 2016

OCD


OCD Pedal

The OCD (which stands for Obsessive Compulsive Drive) is an Overdrive Pedal developed by Fulltone. 
Its a very famous pedal for its drive capabilities (also higher territories, almost distortion like) and its retaining the bass frequencies (a tube screamer kinda pedal is more mid-rangy)

 The OCD is a very simple circuit and easy to build. Its a basically a standard op-amp drive circuit (like a tube screamer) with an enhanced tone stack.
Additionally theres a switch between LP and HP. The HP mode adds additional resistor in parallel, which decreases the output resistance and increases the output / headroom.
 The components required are all easy obtainable.

There are some Projects to build an OCD, one is the Madbean Egodriver (can be ordered via the discontinued Projects page). The Egodriver is great, because of its additional feature, the clipping option. Clipping can be switched between the default MOSFET stage or an additional LED stage. LEDs sound really great for this circuit.

Schematic 


My Build 


Sunday, December 6, 2015

Phase 90

The MXR Phase 90, probably the most popular Phaser Pedal (especially since Eddie Van Halen used it). The Phase 90 is a JFET base Phaser circuit.

It uses 4 JFETs which needs to be matched to get proper phasing. For my build ive used a Madbean NomNom PCB and a matched JFET Quartett from Musikding (2n5952)
You mach the JFETS by yourself too. Instructions for this are in the Madbean NomNom build doc.

 All parts except the JFETs are very easy to obtain.

For my build ive used following mods, which are the original does not have:
  • Rate LED (which is also used as bypass LED)
  • Feedback switch (intesifies phasing, when on)

Schematic


 My Build


Buzzaround Fuzz

Burns Buzzaround

The Buzzaround is a Fuzz Pedal, which is based on the Germanium Tonebender, but has some variations. Soundwise its something between a Tonebender and a FuzzFace.

It features 3 germanium transistors, the original features NKT213, which are very hard to obtain. Ive used AC125 for my build (ordered from musikding).

The Buzzaround is a very simple circuit, and its very easy to build. Projects for the Buzzaround are:
  • Madbean Bumblebee: Very good documentation (as always). Features an additional Volume knob.
  • GuitarPCB FuzzyBee: Ive used this PCB for my build. Musikding also sells kits. Note: If you want PCB mounted pots, then dont go with the kit and order some 9mm PC mount pots.
Since the Buzzaround features PNP transistors, the circuit would be positive ground. Both projects have a IC on board (as of FuzzyBee V2), for voltage invertion. This enables the pedal to be used along a multi  power supply with other standard effects.

Schematic


Drill Plan

Download the Drill Template for the Guitar PCB project here. I have resized the one from the original document.

My Build


Friday, December 4, 2015

Deep Blue Delay with Tap Tempo

The Deep Blue Delay is pedal by MadProfessor. Its a digital delay with smooth analog sound, based on the classic PT2399 chip.
Its very standard, 3 knobs: One for delay time, one for repeats and one for the volume / mix level.

This delay pedal is very expensive. Also it features no tap tempo. Since ive always wanted to do a tap tempo delay, i thought it was good idea to combine.

Parts

This is where ive got all the parts:


Build Instructions

Since the Deep Blue Delay circuit is not intended to use for Tap Tempo, here are some instructions that are essential. Some of them were not mentioned in any build doc
  • Connect Pin 6 of the PT2399 to the according PAD marked on the Taptation PCB.
    Theres an extra Pad on the Sea urchin pcb to do so
  • Omit the Delay pot on the Sea urchin pcb. The delay pot is on the taptation pcb
  • Connect PIN 4 (DGND) of the PT2399 to Ground! this is important, otherwise the Chip keeps locking up = no delay effect
  • Connect a Pull-Down resistor from the output of the effect to GROUND. Ive used a 100k resistor. This is to avoid the loud pop sound, when switching the pedal on/off.
Wire everything else up, as shown in the build docs.

This build should fit easily in a 1590BB enclosure

You find the Sea urchin schematic, BOM and layout here

My Build


Monday, November 2, 2015

King of Tone Overdrive (Queen of Bone)

King of Tone

The king of tone is one of the most hyped overdrive pedals of all time.
Its developed by analogman, but basically its based on the Marshall Bluesbreaker Overdrive. Its a dual channel overdrive pedal, so its basically 2 in 1.
Both overdrive sides are basically identical, beside what clipping diodes and what presence is set in the pedal inside (there are switches for the diodes and a trimpot for the presence)

Schematic


My Build

For my build ive used the Quenn of Bone PCB from Rullywow.com
I can highly recommend it. its not expensive, high quality and a lot of fun to build

i also used the rare MA856 diodes
You can order the MA856 diodes here:
http://www.retroamplis.com/


Tuesday, September 8, 2015

Avalanche / SOV Overdrive


SOV Overdrive

The SOV Overdrive is Tube screamer circuit based OD pedal, with charge pump and some variations. Its developed by the company Free the tone - from japan. Matt schofield is using his custom made version of this pedal

The Avalanche project from rullywow is a take on the SOV. great pcb

Very transparent, loud and dynamic!

Schematic


Drill Plan

Find here the resized drill template of the build doc

My Build

For my build ive used a red powder coated box, with waterslide + envirotex for finishing.
As switching ive used a relay bypass kit (noiseless) from uk-electronic.de  


Thursday, August 6, 2015

Big Cheese Fuzz


Its getting Cheesy

The Big Cheese is a pedal developed by Lovetone, a company from the UK who discontinued making pedal. So all their pedals are kinda "Holy Grails"

The big cheese is a silicon Fuzz Face variant with an Input and output buffer, tone control - tone cap switch etc...a very versatile Fuzz!

there are following tone options:
  • off = disables the tone control
  • 1 = regular tone mode
  • 2 = more midrangy
  • 3 = cheese mode, crazy fuzz mode (the trimpot is to adjust this tone mode only) 

Schematic

My Build

Ive used a feta complis pcb for my build. its a very well made PCB from OSH park (by plesur)
It fits a 125B enclosure nicely and has board mounted pots.
Fuzzdogs pedal parts has also a kit for this.

Also ive drawn a comic mouse for my pedal label :)